Rooms and posts
A rolepy site is divided into multiple rooms. Each room is created by a user, or pre-created by the site admins. Texts posted in a room are visible only to people in that room.
The organization of a room
Each room has two main areas -- the post area and the user area. Posts made to a room appear in the post area, at the top; the user's controls for posting in the room are at the bottom.

The format of posts
Posts can be made to a room in one of two basic formats: in-character and out-of-character. An in-character post is generally made from a handle that represents a given character, but it can be used freely with other handles if needed. An out-of-character post indicates a post being made by the user, as that user. It can be made from any handle, although it is usually made from a handle designated for out-of-character posts.
An OOC post

OOC posts are simple and contain only a few pieces of information:
- The image associated with the handle or user making he post.
- The handle for the post.
- The date, time, and post ID.
- The text of the post.
An IC post
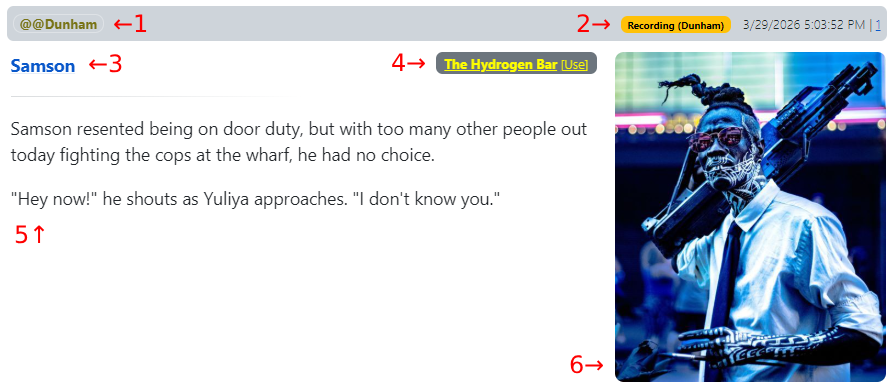
IC posts have more information:
- Username: The user making this post.
- Log, timestamp, and post ID: If the post is being recorded in a log, you'll see who's recording it. The date and time of the post, and the post's serial number, are always visible.
- Handle name: The handle used to make the post.
- Location: The location tag for the post, if any.
- Post text: The text of the post itself.
- Handle image: Any image associated with the handle when the post was made.
Posting to a room
To make a post in a given room, type the text of the post in the box down in the user area and press Enter . You can also click the Post button that appears when you type text.
To insert line breaks in your text, type Shift+Enter.
You can modify how the
Enterkey behaves in your user's settings, so that pressingEnterby itself inserts a line break andShift+Entersends the post. This may help prevent accidentally sending posts.
Selecting a handle
You can choose which handle to use when posting by selecting it from the drop-down list above the post box, at left. If you select [Edit this list], you can customize the list of handles that shows up for that particular room.
Set OOC/IC mode
To choose whether to post in OOC or IC mode, click the toggle to the right of the handle selector.
If you have a handle set to be OOC by default, you'll see [OOC] in the handle list next to its name, and selecting that handle will cause OOC to be automatically enabled.
Choosing images for your post
See "Adding and selecting images" below for more.
Formatting the text of your post
You can use Markdown format to add formatting to your post. See this page for details.
Editing a handle
To change the text displayed with a handle in a post, click the Edit handle button in a room. This will open the handle editor for the currently selected handle.
Location field
The location field provides a convenient way to indicate your character's physical location. This can be a freeform Markdown link (see above for how to format links), or a selection from the drop-down menu to the right. The drop-down menu selections are set by the room's owner.
Status field
The status field is a freeform text field that immediately follows the handle name. It can also be formatted with Markdown. If you want to leave a line break between the handle and the status text, add a linebreak at the beginning of the status field.
Image field
The image field is the URL of the image displayed with the post. You can supply a URL manually, or select an image to insert here from the Images selector (see "Adding and selecting images" below).
URL field
Adding a URL to this field will link the handle to that URL. Normally the handle links to a modal dialog which displays the handle's info in greater detail, the Description field mentioned below.
The full handle editor
The "Open in full editor" button opens an editor for the handle in a separate window. This editor has a few more options:
- Use as an out-of-character handle: Set this to make the handle post as OOC by default.
- Description: The text placed here (which accepts Markdown formatting) is normally what displays when someone clicks the handle name in a room. If you place a URL in the URL field, that URL will be linked to instead, and a triangle icon (▼) will appear next to the handle. Clicking that will bring up the description.
Adding and selecting images
To add and choose images to go with your handle, click the Images button. This opens the image upload and selection panel.
To select an existing image for your handle, click on it. You can delete the currently selected image with the Delete image button.
To upload an image to the server, click Choose File, or you can drag and drop an image into the file chooser field next to it. Click Upload to upload the image to the server and select it for the handle.
If you upload a file that has the name of another file you've uploaded, it will be automatically renamed.
You can search for images by name by typing in the Search handle images box. This field accepts wildcards:
_will serve as a wildcard for any one character.%will serve as a wildcard for one or more characters.
If you want to add an image URL from a remote host that allows linking, you can paste the URL in the Add remote image URL box and click Add.
The All images button opens, in a new tab, a browseable view of all the images currently uploaded to that handle.
Previewing a post
The Preview button opens a pane above the text box and handle selector that shows you a live-updated version of what your post currently looks like. You can use this to preview changes in tags, images, and the text of your post itself.
The preview only updates after about a second of typing inactivity. You can also force an update by closing and reopening the preview pane.
The flyover menu
When you hover the mouse over a post, a menu of options appears on the right-hand side, the "flyover menu". This menu gives you options for this particular post.
On mobile devices you can show the flyover by long-pressing on a post.
You can dismiss this menu by clicking the X if you need access to something under it.
Editing previous posts
To edit a post you made before, use the Edit option from the flyover menu. The text of the post will be placed back in the box where you type posts, where you can change it and re-post it as needed.
You can quickly edit the last post you made without clicking anything. If the post box is empty, press the up arrow key, and your last post will be opened for editing automatically.
Replying to someone else's post
To mark a post you're composing as a reply to someone else's, select Reply from the flyover menu for the post you want to reply to.
You can do this when editing a post, too. This will have the edited post marked as a reply.
Deleting posts
To remove a post from the room, click Delete on the flyover menu. You'll be prompted if you really want to do this.
Room owners and system admins have access to deleted posts.